If your ears haven’t recovered from your last music lesson, Patrick Gazard has some useful tips on classroom layout...
It can be tricky to know how to set out a room in which to teach music effectively, whether it be the music room or your own classroom. The key to remember is this: you can teach a primary music lesson virtually anywhere, and the way you use the space can have a significant impact on the way the sound comes across to the listener.
Once you’ve found an empty space, it’s worth making a few simple checks:
• Sit the children in a circle, on the floor, and join the circle yourself
• Make sure they have enough room to move and express themselves
• If using recorded music, ensure that you can operate it from your seated position with a remote control
• If the lesson involves any writing or drawing, you may need tables and chairs – in which case, get them out when you need them, but not before
Instruments should be issued as and when needed. There is nothing more frustrating for children than to stare at a tempting tambourine but not be allowed to use it. Unless you need instruments as visual stimuli, keep them out of sight until the appropriate moment, or perhaps only have one in the room to start with eventhough you will need plenty more later.
Aim to be flexible in your approach from lesson to lesson (or even during the same one). Think about:
Send groups to work in each corner, with another possibly remaining in the middle. This separates them, allowing the children to hear what they are doing, but also allows you to monitor what is happening.
When performing a ‘call and response’ or ‘echo’ song, divide the class into two and place them on opposite sides of the room. Let the children take it in turns to stand in the middle and hear how the music appears to be coming from alternate sides.
Encourage the children to move around the room while playing/singing at the same time, either in a circle or from corner to corner. Discuss with the class how this affects their performance, both from their point of view and that of the audience.
If you are feeling brave, experiment with other locations such as a church, the school hall, the playground, even the football pitch. Each will have its own characteristic acoustic, and this can lead to some very interesting discussions with the children about the nature of sound.
 Successful practical music-making is all about control, and you must aim to create an environment where everyone understands the impact their playing has on others. This can be difficult, especially for younger children, butit is worth spending time explaining the reasons behind your ‘classroom music rules’. Despite initial appearances, this disciplinary approach does not take the fun out of music: indeed, a disciplined classroom is the only environment in which creative practical music-making can ever truly occur. You might want to start with these two rules.
• No instrument can make any sound without assistance
• Nobody can argue with this statement. (It won’t always work, but even the most fidgety child will soon get the message and you can always remove the instrument of course, at least temporarily.)
You will need a clear signal for starting and, more importantly, stopping. This could be an aural cue – you might hit the cymbal three times – or a visual cue, such as raising both of your hands in the air and the children copying you. An aural cue is often best as there is no guarantee that the children will be watching you when you raise your hand, but three beats on a cymbal will be clearly heard whatever they are doing. Whichever system you devise, be strict about it. Make it clear that anybody who cannot stop when required will not be allowed to start either.
1. Instead of clapping/stamping, explore some quieter, less disruptive alternatives. Ask the children to slap their thighs, or tap their palms with two fingers of the opposite hand.
2. Percussion instruments: it is rarely essential for the children to have one instrument each, and you immediately halve the noise levels by asking them to share.
3. For creative work, ask the children to justify why they need to have a certain instrument before allowing them to collect it, e.g. ‘I need a triangle for the clock chimes’. This prevents the headlong rush to the percussion box.
4. Drums: use them sparingly, especially in a room full of children. You can even request five minute ‘no drumming’ slots, either to the whole class or to specific groups. The designated drummers can still slap their thighs until the drums return.
5. Percussion beaters: rubber beaters are much quieter than wooden ones. Use the former for practice.
6. Piano: resist allowing even the best pianists to use it during the lesson. A piano is very loud, and the sound carries much further than you might think (including into other classrooms). It is far wiser to use a keyboard instead, which has nowhere near the impact. This may well frustrate your piano players, so pacify them by allowing them to play when everyone else has stopped, or even gone.
7. Drum kit: as above, it is simply too noisy to allow practice with others around, although this does not preclude it being used in the actual performance.
8. When practising there is no need for pupils to do anything loudly: hit a drum harder, and it will be louder – there is no need to prove it until the performance. This can be a tough rule to enforce the children’s natural instinct will be to compete with other sounds around them − but persevere.
Many of the above suggestions may well be seen as ‘anti-musical’: how can you teach about the importance of dynamic contrast (loud/soft) and then not allow the children to practise it, for example? What message does that send? It is a fair point but, as described above, this element is not being ignored, just delayed slightly. When it comes to the performance, the contrasts will be clear and the players will adapt.
However, always remember that successful practical music lessons cannot be conducted in silence. Every child must recognise that this is a team effort, and must respect each other’s needs. It is tricky to get the balance right – you will never keep everybody happy – but please try. The rewards are immeasurable.
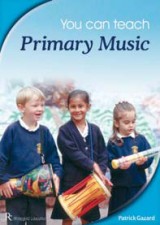
This is an edited extract from You Can Teach Primary Music by Patrick Gazard (Rhinegold Education), a book aimed at the non-specialist teacher to increase confidence and improve the delivery of music in the classroom. Described by the Schools Music Association as ‘essential reading for all teachers at primary level’, the book has been acclaimed by head teachers, music specialists, experienced reviewers and academics.
Patrick has been working in music education for twenty years and is now a freelance musician. He is always delighted to deliver training to students, generalist primary teachers and music subject leaders. http://www.patrickgazard.co.uk
When I was teaching, I would have wanted this book in my classroom permanently… invest in a copy and you will be able to teach primary music (Primary PGCE course teacher, University of Cambridge)
 Copies of You Can Teach Primary Music are available from Musicroom. Apply now for the Educator’s discount for 10% off your purchase at musicroom.com/teach
Top tips for differentiation
Ace-Maths
Make World Book Day Extra Special This Year
Ace-English
