


Robert Watts takes Indonesian stories as the starting point for creating beautiful batiks...
One of the appealing features of traditional tales is the sense that we’ve heard the story somewhere before, though we often can’t quite remember where. There’s something about the plot that sounds familiar: we know that the hero will suffer slings and arrows for a while before he finally succeeds in living happily ever after with the girl next door who, more often than not, turns out to have been a wealthy princess all along.
As children extend the range of texts they read, they gradually realise that while different cultures have their own unique stories, these tales are often handed down through generations in much the same way as the fairy tales they grew up with themselves. There’s also a sense of continuity in terms of the moral content of these stories, and it’s important for children to understand that, throughout history, people from all over the world have struggled with the same dilemmas and succeeded in resolving them in similar ways.
The visual elements of traditional tales can play an important role in helping a story to become lodged in children’s minds, and the illustrations they come to associate with a particular tale can help them to locate the story in a specific culture. And, as the activities on these pages will show, they can also provide inspiration for children’s work in art and design.
• Batik kettle
• Tjanting tools
• Rectangles of cotton and/or paper
• Scraps of material
• Watercolours and/or fabric dye and palette
• Thin brushes for applying dye
• Drying rack
• Newspaper
• Iron/ironing board
 Introduce children to Indonesian artwork…
Indonesian Children’s Favourite Stories, a collection of traditional tales retold by Joan Suyenaga and illustrated by Salim Martowiredjo, forms the inspiration for these activities, which centre on the process of batik. Batik is a traditional method for creating images and patterns widely used in Indonesia, Malaysia, China and other parts of South and Central Asia and Africa. It is a resist process: that is, it involves the application of a waterproof material such as wax to a surface that is then painted with water-based paints or dyes. The complex patterns that emerge appeal strongly to children – there’s a real sense of magic in the process.
There’s also a slight sense of danger! The wax used in batik needs to be melted in a wax kettle, and the health and safety implications might be enough to discourage some teachers from reading any further. However, having experimented with teaching this technique to children as young as four, I can reassure readers that, providing a few simple rules are followed (see box right), this is a process that can be safely carried out in the primary classroom – and the end results will be well worth the effort invested.
Follow these steps to minimise risk…
• Work with a group of six children or less; each child should be seated within easy reach of the wax kettle and should have their own tjanting tool.
• The wax kettle needs to be plugged into the mains and the mains lead should be taped down to the table to avoid it being accidentally moved.
• Warn children not to touch the metal rim of the kettle or the metal ‘ball’of the tool – these are hot.
• Batik wax comes in bags of small beads that can be poured into the wax kettle: make sure the kettle is at least three quarters full of wax, so children won’t have to reach far in to the kettle with their tools.
• Demonstrate to children how to hold the batik tool in the middle of the wooden handle, where it balances easily and is not too close to the hot metal ball.
Teach your class the following techniques…
• Leave the metal ends of the tools in the wax kettle for a few minutes to heat up – this will ensure the wax stays in its liquid form for a while.
• Demonstrate how to remove the tool, ensuring that it is not overflowing with wax. You don’t want it to drip.
• Brush the underside of the metal ball on the edge of the kettle to remove any extra wax that might drip on your design.
• Move the tool smoothly across to the paper or fabric – you can use an additional scrap of fabric to catch any drips on the way.
• Touch the ‘tap’ of the tool gently on to the surface of the paper or fabric and make a smooth, continuous line. The wax should appear on the surface as a dark line - if it looks more like little birthday candles then it’s not hot enough.
• Once the wax is on the surface of the paper or fabric, it will dry almost immediately. You can then use either fabric dyes (on material) or watercolour paints (on paper) to complete the design: the wax will resist the colour.
• Experiment with blending different colours together on the surface (rather than mixing them in a palette). When the design is complete, lift it onto a sheet of newspaper and place it on a rack to dry.
• Finally, the wax needs to be removed by placing the batik between a few sheets of newspaper and ironing it with a hot iron – a task that parents are usually happy to help with at home.
Don’t be afraid to experiment…
 Add texture
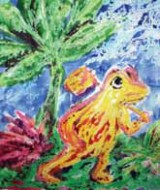
The tale of Katak, featured in Indonesian Children’s Favourite Stories, concerns a boy ‘born in the shape of a frog’ and inspired this image, created using oil pastels and watercolours. Interesting textures can be created by placing the paper on a rough surface and drawing with the side of the pastels, before washing the watercolour over the top, emphasising the contrasting colours.
 Start simple
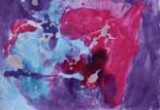
Controlling the tjanting tool can be difficult at first, and it’s a good idea to let children begin their first batik by experimenting with abstract designs rather than producing a specific image. This composition was made on paper before fabric dye was brushed over the top and wet colours were allowed to merge on the paper.
 Create portraits
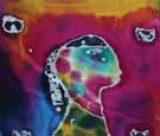
As children become more confident with using the tjanting tool, they can attempt more figurative images. This portrait was sketched lightly on to a piece of fabric before wax was applied: again, the colours are allowed to merge into watery patterns.
 Improvise
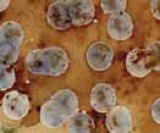
No Batik equipment in the art cupboard? For a back-to-basics approach, try lighting a candle and carefully dripping wax on to the paper, before applying a wash of colour - in this case, coffee! - across the surface.
 Try different tools
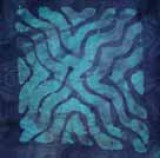
This lovely design was created by cutting away sections from a piece of hard sponge to create a repeat pattern; the sponge was then dipped into the hot wax and placed upon light blue fabric, before being dyed a darker blue.


Power Maths – A Child-Centred, ‘Can-Do’ Mastery Teaching Programme for KS1 and KS2
Category: Maths

Fit To Dance Schools From Disney On Ice
Category: Other

‘S!ng Sensational’ And ‘A King Is Born’ – Two Fun New Musical Masterpieces That Children Will Love
Category: Music

Product review: Schofield & Sims Fractions, Decimals & Percentages
Category: Maths

Becoming a teaching school
Ace-Heads

Use scaffolding to wean children off high levels of TA support
Ace-Kitchen-Manager

The side effects of teaching music
Ace-Music


