


Professor Mike Askew's visual and physical approach to teaching position and movement will help children to get a firm fix on the subject...
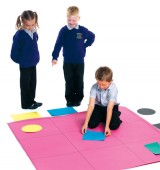
Children in KS1 need experience of observing, visualising and describing positions, directions and movements using common words. Working with simple grids helps to provide a structure for describing position and sets the foundation for later work with co-ordinates.
Please can I have?
This game helps children to observe, visualise and describe positions based on a simple grid system.
Playing in pairs, each child needs a 3 x 3 grid of squares each about 5 x 5cm. The top of the grid needs to be marked with a symbol so that children know which way to orientate the grid. Each child has four different coloured cubes (matched with their partner’s). The pair also needs a book to stand up as a screen so they cannot see each other’s grid.
The child to go first places her cubes on four different squares of the grid. Her partner then asks where to put each cube on his grid so that the arrangement matches – the child who put the cubes out describes where to place the asked for colour. The children check to see if their completed grids match and then swap roles.
Putting coloured cubes in place and describing their position helps young children to embody the ideas of position and link them to everyday language such as ‘in front of’, ‘next to’ and ‘behind’.
Once they are more confident, children can play the game on a 6 x 6 grid. This makes it more difficult to specify different positions on the grid without some system. Encourage the children to develop a way of labelling the squares, perhaps with colours along one side and letters or numbers on the other.
What goes in the square?
This extends the ‘Please can I have?’ activity above to introduce labelling of rows and columns. You need to lay out a large 3 x 3 grid on the floor: this could be chalked on the playground or hall, or marked out on the classroom floor with masking tape or with nine square carpet tiles. You also need a collection of plane shapes of three types – square, circle and triangle – and three colours - red, yellow and blue for instance. Finally, you need to prepare six labels for round the outside of the grid, three showing the hollow outlines of the shapes and three with ‘swatches’ of colour on them.
Organise all the children so that they are facing the grid from the same position as you: the language of position used here will be relative to their viewpoint; being all around the grid will lead to confusion in the language used.
Put the three colour labels below the bottom row of the grid – the children can help choose the order to put these in. Then arrange the shape labels up the side of the grid.
Starting with one of the plane shapes, say the red square, correctly place it on the grid (in the column above the red swatch and in the row headed up with the outline square). Without saying anything, place another shape in the appropriate place. Finally place a third shape on the grid but in a position that is clearly incorrect (wrong colour and wrong shape). Ask the children to talk to the person next to them and to decide whether or not the shapes are all in the best place on the grid. Talk about the position of the two that are appropriately placed and why the third is not. Who can say where to correctly place the third shape?
Work with the children to place the remaining shapes. Some may describe the position in terms of pieces already on the grid (‘put it above the yellow circle’) while some may start to use the labels – either approach is fine. Talk about the words being used: above, next to, on the right and so forth.
When the nine spaces are filled, play a guessing game. You secretly select one of the shapes on the grid and the children ask questions to find out which shape you are thinking of. Talk about good questions to ask such as:
• Is the shape in the middle row?
• Is it in the row of triangles?
Children can take it in take turns at secretly choosing a shape for the others to identify.
 In KS2, children can begin to visualise and describe position using more mathematical language and be introduced to coordinates. Doing this in a whole-bodied setting helps children get a physical sense of position and how to describe it.
Be seated
Arrange 16 chairs in 4 rows, a short distance apart, all facing the same way. The class sit in front of the arrangement of chairs, as though on a stage looking out to the audience.
Establish which one of the chairs is designated as being in the first row and the first column and that this will be referred to as the chair in position ‘one, one’. Which chair do the children think you are referring to when talking of the one in position ‘three, two’ – is this the chair in row three, column two or the chair in column three, row two? Establish the convention that the position is described by going along first to find the column that the chair is in and then ‘up’ that column to the row specified by the second number. Don’t expect the children to immediately be correct in their use of language here – it is confusing that you need to go along the first row to find out which column you are in!
Ask four or five children to take up seats. In turns, can they and the ‘observers’ work out which column and row their particular chair is in and describe their position using this ordered pair of numbers. You’ll need to judge when you think it is appropriate to introduce the language of coordinates.
Invite children take up a chair by giving them appropriate instructions. For example:
• Joao please go and sit in the chair in column four, row two
• Sandy, will you go and sit in chair three, four.
Children not yet sitting can give similar instructions to others to take up seats. When most of the seats are full, give various instructions to carry out. For example,
• Children sitting in 2, 2 and 4, 3 please stand up and swap places
• Everyone in row three please stand up.
Again, once the idea of this is clear, children can give the instructions.
When certain children have been asked to stand – for example everyone in column two – ask them, in turn, to say their own position (coordinates).
Jot these down on the board. What do the children notice that they all had in common (in this case a first coordinate of 2). Can anyone explain why this has happened?
Set the children challenges such as:
• Which children need to stand up so that their second coordinate is 4?
• Which children need to stand up so that both their coordinates are the same?
• Which children need to stand up so that their second coordinate is larger than their first?
Treasure hunt
From this large scale introduction to coordinates, children can work in pairs playing simple ‘hidden treasure’ games – making up a grid, say 6 x 6 and deciding where to hide five or six items. Their partner, working with a blank grid, has to find the secret squares by giving coordinates. Rather than simply saying ‘yes’ or ‘no’ for a hit or miss, the children can give ‘traffic light’ responses: ‘green’ for landing directly on a square with treasure in it, ‘yellow’ for being just one square away (sharing a common edge, but not corner to corner) and ‘red’ for being further away.
 As children move through KS2 they start to locate and draw shapes using coordinates in the first quadrant, then in all four quadrants and to examine the effect of movement – translation, reflection and rotation – on these.
Plot the quadrilateral
This sequence of activities develops from creating and using coordinates through to exploring translations, reflections and rotations involving all four quadrants.
Using only the digits 1, 2, 3 and 5, the children, in pairs, list all the possible coordinate pairs that can be made with these digits - there are 16 in all, including (1,1), (2, 2) and so forth and the reversed pairs such as (3, 5) and (5, 3).
Selecting only from these coordinates, can the children choose sets of four that when plotted on a coordinate grid and joined produce these quadrilaterals:
• Square
• Rectangle (that is not a square)
• Parallelogram (that is not a rectangle)
• Rhombus (that is not a square)
• Trapezium
They should record the coordinates for each of their quadrilaterals.
Starting with a simple translation, children explore the effect of this on the coordinates of their quadrilaterals. For example, you might give them the translation ‘move five squares to the left and three squares up.’ Children apply this to one or two of their quadrilaterals, writing down the original coordinates and then the coordinates after the translation. If they can identify a relationship between the coordinates before and after the translation, they can then predict what the coordinates of a quadrilateral will be before carrying out the translation, checking their prediction by performing the translation.
Working together, can the children come up with a statement that expresses, in general terms, the effect of the translation on the coordinates. For example: “Moving 5 squares left means subtracting 5 from the first coordinate and moving 3 squares up means adding 3 to the second coordinate”.
As children make up their own rules for translations, try these out and see if they can express the general rules. As they are doing this, watch out for children who seem ready to use the language of x-coordinate and ycoordinate instead of first and second.
Simple reflections - reflecting in the y-axis or reflecting in the x-axis - can be similarly explored.
Finally, the children can play with what happens with rotations about the origin, clockwise and anti-clockwise through 90º or 180º.


Power Maths – A Child-Centred, ‘Can-Do’ Mastery Teaching Programme for KS1 and KS2
Category: Maths

Fit To Dance Schools From Disney On Ice
Category: Other

‘S!ng Sensational’ And ‘A King Is Born’ – Two Fun New Musical Masterpieces That Children Will Love
Category: Music
Product review: Schofield & Sims Fractions, Decimals & Percentages
Category: Maths

Teaching Mandarin via video conference
Languages


