


Use art to study the natural world in detail and children will discover its intricate beauty, says Robert Watts...
When I was a schoolboy, way back in the last century, one of the things I loved doing seems, well, a little old-fashioned. Nature study, we used to call it, in those innocent years BNC (Before the National Curriculum). At the first signs of the changing seasons, my classmates and I would be sent to explore the distant corners of the playing field, to pounce victoriously on unsuspecting daisies before plucking them out of the soil and sellotaping them into our exercise books.
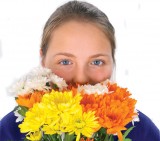 Back in the classroom, we would endeavour to make detailed drawings of our specimens, and I like to imagine that our teacher encouraged us with the words of the Victorian art critic John Ruskin: “I would rather teach drawing that my pupils may learn to love nature, than teach the looking at nature that they may learn to draw.” I suspect Ruskin would be horrified to find that, today, some children would be more inclined to Google a daisy than draw it. Technology is a wonderful thing, but there’s no substitute for close observation of the natural world, and no better time to observe its rapid changes than in spring.
This project aims to encourage children to observe the changes taking place in their environment at this time of year, and to bring together old and new approaches to making art. On these pages you’ll find ideas for a range of creative activities involving drawing, painting, printmaking, sculpture, collage, photography and ICT. Some are activities that Ruskin would recognise, others would have left him baffled by technology, yet all are designed to encourage children to follow Ruskin’s advice that “we should learn to notice; to see rather than to look.”
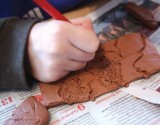 Children can make a class set of clay tiles that features a continuous, connecting design of intertwining leaves and stems. Provide each child with a piece of clay and encourage them to spend some time kneading it – this will soften the clay and make it easier to roll into a flat shape.
• Agree on the dimensions of the tile as each child will need to work on the same scale. Postcard-size is fine. Measure the first tile then use it as a template for the rest.
• Explain to children that their tiles will be displayed as a set and that their design must follow a simple rule so that the lines flow smoothly from one tile to the next.
• Make two notches along the top edge of each tile and two along the bottom. These will be the ‘entry’ and ‘exit’ points for the continuing pattern, so the notches need to be consistent across each tile.
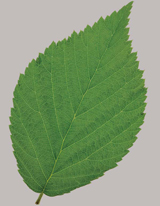
• Children can draw into the clay directly from plants, or from drawings made earlier. Encourage them to look closely at the patterns and textures of the plants they are drawing and to experiment with ways of recreating these textures in the clay.
• Display the tiles as a group, taking care that the continuous lines link from one tile to the next.
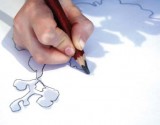 Children’s observational drawings and paintings of plants can occasionally lean towards the formulaic; try using the shadow of a plant to provide a base from which to experiment with tone and colour.
• Begin by placing a potted plant on a sheet of cartridge paper beneath a light source so that it casts a clear shadow across the paper.
• Children should use sharp pencils to draw carefully around the shape of the shadow on to the paper. Encourage them to look closely at the details of the lines and shapes.
• Provide watercolour paints, thin brushes and water. Demonstrate to children how to mix different tones of green using yellow with a touch of blue; emphasise how adding more water will make the paint more translucent.
• Some watercolour sets will offer a couple of shades of green that children can use, but remind them to try mixing the colours as well as using them straight from the palette.
• Experiment with applying a small amount of clean water to a section of the painting, then carefully placing a few drops of colour in to the water. The pigment will spread across the paper, creating rippling effects.
• Suggest to children that they leave little areas of the image clear – these provide effective highlights for the painting.
• Encourage children to use specific vocabulary to describe their paintings: line, tone, lighter, darker, deeper.
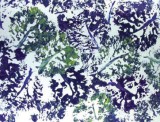 Making leaf prints is a simple idea that can easily be extended to create complex compositions.
• Begin by making a small collection of leaves – there’ll still be some left from autumn, but you could also cut some from plants that need containing, such as ivy.
• Squeeze a couple of blobs of printmaking ink onto a flat palette and use a plastic knife to mix two colours together.
• Flatten a leaf into the ink, remove it and press it on to the paper. Make several prints at this stage as you’ll find that each will be slightly different.
• Talk to children about the variety of tones and textures of the leaves – it often becomes more noticeable once it has been printed on to paper.
• Now think about composition. Repeating a pattern across the page or experimenting with rotating interlocking designs is an effective way of turning a simple activity into a more complex one.
 Digital cameras are widely used in schools – ensure that children have access to a camera from time to time and that they understand its basic functions. The increase in the use of photography offers children new opportunities to notice and appreciate their surroundings.
• Take a small group of children for a walk around the outside areas of the school and encourage them to look for signs of life. Even if you don’t have a school garden, or a patch of grass, there will be something!
• Demonstrate how to get close to the subject of the photograph and to use the zoom facility on the camera to ‘edit’ what they can see.
• Although cameras make it easy for us to ‘point and click’, there are still decisions to be made. Talk to children about the decisions they are making, particularly with regard to composition, encourage them to describe what it is they are interested in photographing and why.
• Back in the classroom, display the photographs to the group using a PC or whiteboard. Explain that this is the next part of the editing process: they need to decide which images to keep and which to delete.
 Making observational watercolour paintings of an individual plant or flower offers children opportunities to reflect on the amount of detail they are including in their work.
• Explain to children that they are going to be making large paintings of small flowers. Working ‘larger than life’ prompts children to pay closer attention to the visual information they have in front of them.
• Use magnifying glasses to study the detail of a selection of plants
• Encourage children to begin by making pencil line drawings of the details of the flowers, working across the whole of the paper.
• Add layers of watercolour to the drawings, concentrating on applying different tones of each colour. As before, experiment with adding more water to create translucent tones.
• Add a background of strong colour to the painting to create a dynamic effect, ensuring that every part of the surface of the paper is covered.
Any of the practical ideas described on these pages can be extended into ICT using a simple art program. Alternatively, these ideas could be carried out as traditional cut and paste collages, using photographs of children’s artworks printed from the PC.
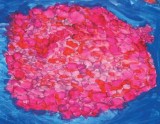
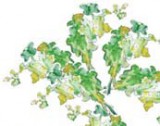 Image 1
In this image the watercolour painting has been scanned in to the computer and pasted in to a document with a ‘transparent’ background. The image is then traced around so that the background is deleted, then copied and pasted several times. Each of these ‘layers’ can be rotated or reflected and moved around to create a new composition.
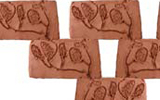 Image 2
One of the clay tiles has been scanned in to the art programme and repeated to create a pattern of six identical tiles. Some of the tiles have been reversed, but they are placed carefully to allow the pattern of lines to continue across.
 Image 3
This image is composed of four repeated images of the same section of one of the watercolour flowers. One of the images is left as it was, the second is flipped horizontally, the third flipped vertically and the last flipped horizontally and vertically! The four parts come together to create a symmetrical pattern.
 Let children know why and what they are learning…
Each of the activities on these pages addresses one or more of the elements of art and design: line, tone, colour, shape, space, texture, form, pattern and composition. While young children are unlikely to be able to remember all of these elements, encourage them to be aware of how what they are doing or making relates to one or more of these elements. The best way to do this is through talk. Through working alongside children, describing what you are doing and what they are doing, you will create opportunities to introduce specific vocabulary. Alternatively, use the end of the lesson (or the beginning of the next lesson) to reinforce these terms while sharing examples of individual children’s work with the class.
1. Although cameras make it easy for us to ‘point and click’, there are still decisions to be made. Talk to children about the decisions they are making, particularly with regard to composition, encourage them to describe what it is they are interested in photographing and why.
2. Some watercolour sets will offer a couple of shades of green, but remind children to try mixing the colours as well as using them straight from the palette. Experiment with applying a small amount of water to a section of a painting, then carefully placing a few drops of colour in to the water. The pigment will spread across the paper, creating rippling effects.


Power Maths – A Child-Centred, ‘Can-Do’ Mastery Teaching Programme for KS1 and KS2
Category: Maths

Fit To Dance Schools From Disney On Ice
Category: Other

‘S!ng Sensational’ And ‘A King Is Born’ – Two Fun New Musical Masterpieces That Children Will Love
Category: Music

Product review: Schofield & Sims Fractions, Decimals & Percentages
Category: Maths

The side effects of teaching music
Ace-Music


