


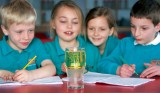
Sue Martin uses dancing raisins and homemade lava lamps to help children understand some key scientific concepts...
Making mini lava lamps and watching raisins ‘dance’ are two experiments that have been a big hit in my classroom. Both activities take a hands-on approach to science and help to develop children’s understanding of floating and sinking, the properties of liquids and gases, and chemical changes. They also provide plenty of opportunities to practise good observation and investigation skills. If you’d like to try out the experiments with your pupils, here’s how.
 Each group will need
• A bottle or glass of clear fizzy drink (e.g. lemonade, tonic or soda water – freshly opened)
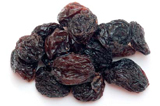
• A handful of raisins (four or five will suffice)
Simply pour out a glass of fizzy drink and drop in the raisins. Now watch the raisins dance!
After the children have had a little while to observe the raisins ‘in action’, I encourage them to closely observe the beaker. I then use detailed questioning to draw out the observations that will ultimately help them to understand the process.
The raisins are initially too heavy to float, so they sink into the drink. The drink itself contains carbon dioxide (CO2) gas, which has been forced into the drink at high pressure. When a bottle is opened, some of this gas escapes immediately (you hear the whoosh as it rushes to escape) but the rest remains in the liquid for quite a while. You may notice that bubbles form on the sides of the container first.
Ask the children to describe where they see bubbles before they drop in the fruit.
Tiny imperfections in the glass/plastic make ideal sites (known as ‘nucleation sites’) for bubbles of gas to form. Dropping anything else into the drink will provide more of these sites, so more bubbles are produced. Raisins have a pitted surface, which makes them ideal for the formation of gas bubbles. When the raisins reach the bottom, bubbles of CO2 form and attach themselves to the raisins. These act like floats for the raisins and together they rise to the surface. Here, the gas bubbles burst into the air, leaving the raisins without their floats to sink again. The process repeats and the raisins dance up and down! This will continue only whilst the drink is still fizzy – as more bubbles burst at the surface, fewer remain in the drink, until eventually it will become ‘flat’.
 Try to ensure the children notice that the raisins only surface when the bubbles form on them. You will probably need to tell them that the pits on the surface allow the bubbles to form. Focus on the bubbles that reach the top. The children should watch the bubbles on top of the raisins burst; the raisin flips over and the bubbles that were on the underside then burst before the raisin sinks. It is these detailed observations that make the experiment worthwhile.
Ask the children what would happen if you dropped in a smooth pea – and test their predications (it won’t float as there are no pits on which the bubbles will form).
Older children should consider why the bubbles make the raisin float. (Children will probably suggest that the bubbles makes the raisin lighter).
Of course, the raisins themselves are not lighter, but with bubbles attached, the ‘raisin plus bubbles’ is less dense than the liquid (this means that for its volume, the ‘raisin and bubbles’ is lighter than just a raisin of that size or the liquid it is in). For children, use the analogy of wearing arm bands in a swimming pool: a non-swimmer may sink without them but the same body will easily float with them on – this is a good enough explanation for now!
If you are able to use a bottle with a screw-on lid, repeat the investigation with the lid screwed on. This will allow the carbon dioxide to build up over the surface of the drink and increase the gas pressure above the liquid. As the pressure increases further, bubbles of gas are prevented from forming on the raisins in the drink and they should remain at the bottom until the lid is released again.
Encourage your children to try other small food items to see which ones float, sink or dance. Broken pieces of spaghetti, numerous other pasta shapes, lentils, uncooked popcorn and some berries will also dance. Look at the surface of each item and try to predict which will work well. With the spaghetti, it is possible to try various lengths and to investigate how this affects the floating and sinking. You may need to consider the number of nucleation sites created as well as the mass of the spaghetti to be lifted – this could generate some interesting discussions!
Consider whether the number of items placed in the drink affect how quickly it becomes flat (this investigation could take some time!).
Consider whether the type of fizzy drink affects the rate at which the raisins rise and fall. Perhaps some drinks are fizzier than others? Ask the students to think about ways of taking measurements (such as how often a raisin will rise and fall in a minute).
The experiment is really good for developing observation skills in both older (KS2 students) and very young children (I have used this with three-year-olds, who were able to suggest that it was the bubbles that made the raisins float).
 Making ‘lava lamps’ seems like a difficult proposition for a group of primary school children – but it couldn’t be easier. Gather together some readily available materials and they will be up and running in minutes. Now your children are learning about immiscible liquids, chemical reactions, dissolving; and having fun!
Each group will need
• A large test tube or bottle with screw lid
• Cooking oil
• Alka-seltzer or effervescent vitamin C tablet
• Water
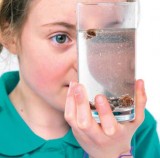
Pour cooking oil into the test tube until it is approximately 3/4 full.
1. Top up the tube or beaker with water. Leave about 1cm of space at the top to prevent overflowing. Notice that the water falls to the bottom of the test tube.
2. Break an alka-seltzer or effervescent vitamin C tablet into around 6-8 small pieces and drop a piece into the test tube. Again, watch as it travels through the oil and into the water at the bottom. The water will begin to fizz and your mini lava lamp erupts into action.
3. As fizzing stops, add further pieces of tablet, until all bubbling ceases.
With a lid screwed on the test tube, you can tip the tube back and forth, watching waves appear. (Be careful not to screw a lid onto the test tube when the tablet is still active as pressure will build up in the container, either forcing the contents out as you open the tube or blowing the top off).
 Water and oil are immiscible (they don’t mix). Water is also denser than oil (i.e. for the same volume of each, water is heavier than oil). So the water sinks below the oil, which floats on top. I always make sure the children observe this before we start the ‘lava’ production and understand the concept of density.
Effervescent tablets contain chemicals that can only react together when they are wet. They are denser than both oil and water, so fall to the bottom of the test tube. As soon as a piece comes into contact with the water layer, a reaction occurs between the chemicals, producing carbon dioxide (CO2) gas. These CO2 bubbles attach themselves to ‘blobs’ of the water like floats, causing them to rise to the surface, through the oil layer. (Try to ensure the children see the gas attached to the water ‘blobs’ acting as floats.) At the surface, the gas bubbles pop, the water loses its float and sinks back through the oil to the bottom of the test tube. This process can continue whilst the tablet continues to react and produce CO2.
Colouring from the tablet dissolves in the water layer and produces coloured ‘lava’. Dissolving is a physical change, which is reversible. The dye is simply dispersed in the water. A few drops of any food colouring may be added if colourless tablets such as Alka-selzer are used and will be observed to dissolve only in the water layer, to create coloured ‘lava’.
Once the reaction is over, with a lid on the test tube you can observe the motion of oil and water as you rotate the test tube – the oil layer remains above the water.
Children may wish to compare the rate of bubble production between different types of effervescent tablets (denture cleaning products will also work!), brands etc. The size or number of pieces of tablets used may also be altered. Consider making direct observational comparisons between test tubes for younger pupils, whilst encouraging more able pupils to time the rate of reaction or length of reaction that occurs. My Y6 class videoed their tubes, then evaluated the rates of reaction more carefully as they played back their recordings.
You can find full details of these and other activities, including use of detailed questioning to develop children’s understanding, in Fizz, Bubble, Pop, published by TTS Group


Power Maths – A Child-Centred, ‘Can-Do’ Mastery Teaching Programme for KS1 and KS2
Category: Maths

Fit To Dance Schools From Disney On Ice
Category: Other

‘S!ng Sensational’ And ‘A King Is Born’ – Two Fun New Musical Masterpieces That Children Will Love
Category: Music
Product review: Schofield & Sims Fractions, Decimals & Percentages
Category: Maths

5 Ways To Celebrate World Book Day
Ace-Classroom-Support

5 friendship and emotions intervention ideas
Ace-Classroom-Support


